Send Email Action
•Example: Using the Send Email Action (CAD)
•Graphical Action Designer: Send an email Quick Action
About the Send Email Action
Use the Send Email action to compose an email to send to a designated person or group. For example, you can send a confirmation email when a change is approved. The email can be populated with data, such as field values, functions, counters, or global values.
You also can send updates to the calendar application of the target group, such as task updates when an change occurs in an incident or change record.
Group emails are facilitated using address book-style functionality. The default is to send one email. To send an email for each record in a relationship, select the appropriate radio button, then select the related business object from the drop-down list. This also allows you to select email targets for the parent record and related record when completing the email template.
You can also send emails to child business object records associated with the parent business object. An email is sent for each instance of the child business object.
Journal.Email records are linked to the parent business object when running the Send Email action and business rule, regardless of whether the relationship internal reference name is defined or not.
The behavior for escalation and workflow services in Neurons for ITSM is as follows:
•Only one relationship exists between two business objects.
•If more than one relationship is found, the relationship references cannot be resolved unless one of the relationships has an empty internal reference name.
•If more than one relationship exists and neither one can be removed, contact Ivanti support to remove the internal reference name. This allows escalation and workflow services to uniquely identify it.
Parameters
Some parameter field names may differ slightly in the Graphical Action Designer UI.
| Parameter | Description |
|---|---|
| Enter action name | A unique name for the action. |
| Enter action description | Optional. A description of what the action does. |
| Enter category | Optional. The category. Select from the drop-down list. |
| Log in Journal |
Specifies which emails to keep. Select one of the following: All: Default. Keeps all emails. Failed: Keeps only failed emails. To view the emails, log in to the application and open the Email workspace. The list in the Email workspace contains a column called Sent that indicates if the application sent the email. If you set this parameter to Failed, the application enters an N (for no) in this column. |
| From |
The address from which the email is sent. Can only contain one entry. Click Add or Address book to enter the address. |
| To |
The address or addresses to which the email is sent. This field can contain multiple entries. Click Add or Address book to enter the addresses. |
| Add CC |
Adds a CC (carbon copy) field to the form and enter addresses. |
| Add BCC | Adds a BCC (blind carbon copy) field to the form and enter addresses. |
| Subject |
The subject of the email. You can either enter a subject or create an expression-based subject. |
| Email body text area |
The body of the email. Construct the body of your email using the controls in the email body area. |
| Attach a file |
Allows you to include attachments. Click to attach a file to the email. |
| Attach from related |
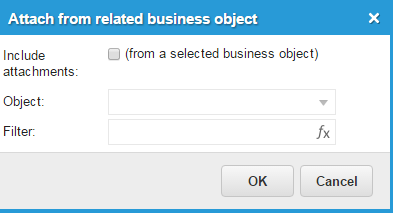
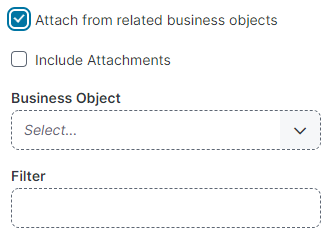
Allows you to attach a related business object. Select the Include Attachments checkbox, and then select a business object from the Business Object drop-down list. Dialog in the Classic Action Designer Dialog in the Graphical Action Designer |
| Prompt for attachments | Prompts you to attach a file. Toggles between Off and On. |
Actions
| Button | Action |
|---|---|
| Save | Saves your settings. |
| Cancel | Exits without saving. |

